Build Your Own Mobile Proxy for Web Scraping


Build Your Own Mobile Proxy for Web Scraping

In this guide, we show how you can build your own mobile proxy pool step by step. The most common use case for mobile proxies is web automation. If you want to improve reliability and performance of your web automation workflows, this guide is for you.
This guide is only applicable for a small, home-scale mobile proxy setup and does not cover some advanced intricacies of running mobile proxies, recovery from various modem failures, rotating proxies, etc.
If you need access to a reliable production-grade mobile proxy pool for web scraping, consider using our product.
What is a mobile proxy
One of the most important factors affecting success rate of web scraping is proxy quality. There are three main types of proxies:
- Datacenter: offer large pool of cheap IP addresses belonging to datacenters and cloud server providers that are often blacklisted and usually not suitable for web scraping
- Residential: provide IP addresses from Internet Service Providers (ISP) pool that are shared with other users
- Mobile: the best class of proxies for web scraping that is based on ephemeral IP addresses which are frequently exchanged with mobile network users who move between Base Transceiver Stations (BTS)
Mobile proxies are the most expensive ones, but it can pay off to build your own pool by following this guide. We will show you how to change the IP address on demand so that you can generate thousands of IP addresses daily.
Hardware
Let's start with the hardware and tools which you're going to need.
- Raspberry Pi for hosting the proxy service.
- nanoSD memory card for Raspberry Pi OS and SD card adapter for installation.
- A computer with SD card slot to install Raspberry Pi OS on nanoSD card and USB-A port to initialize 4G USB modem.
- An Ethernet cable to connect Raspberry Pi to a local network.
- A 4G USB modem with a SIM card.
- Optionally, USB hub if you want to connect more than 2 dongles.
Raspberry Pi
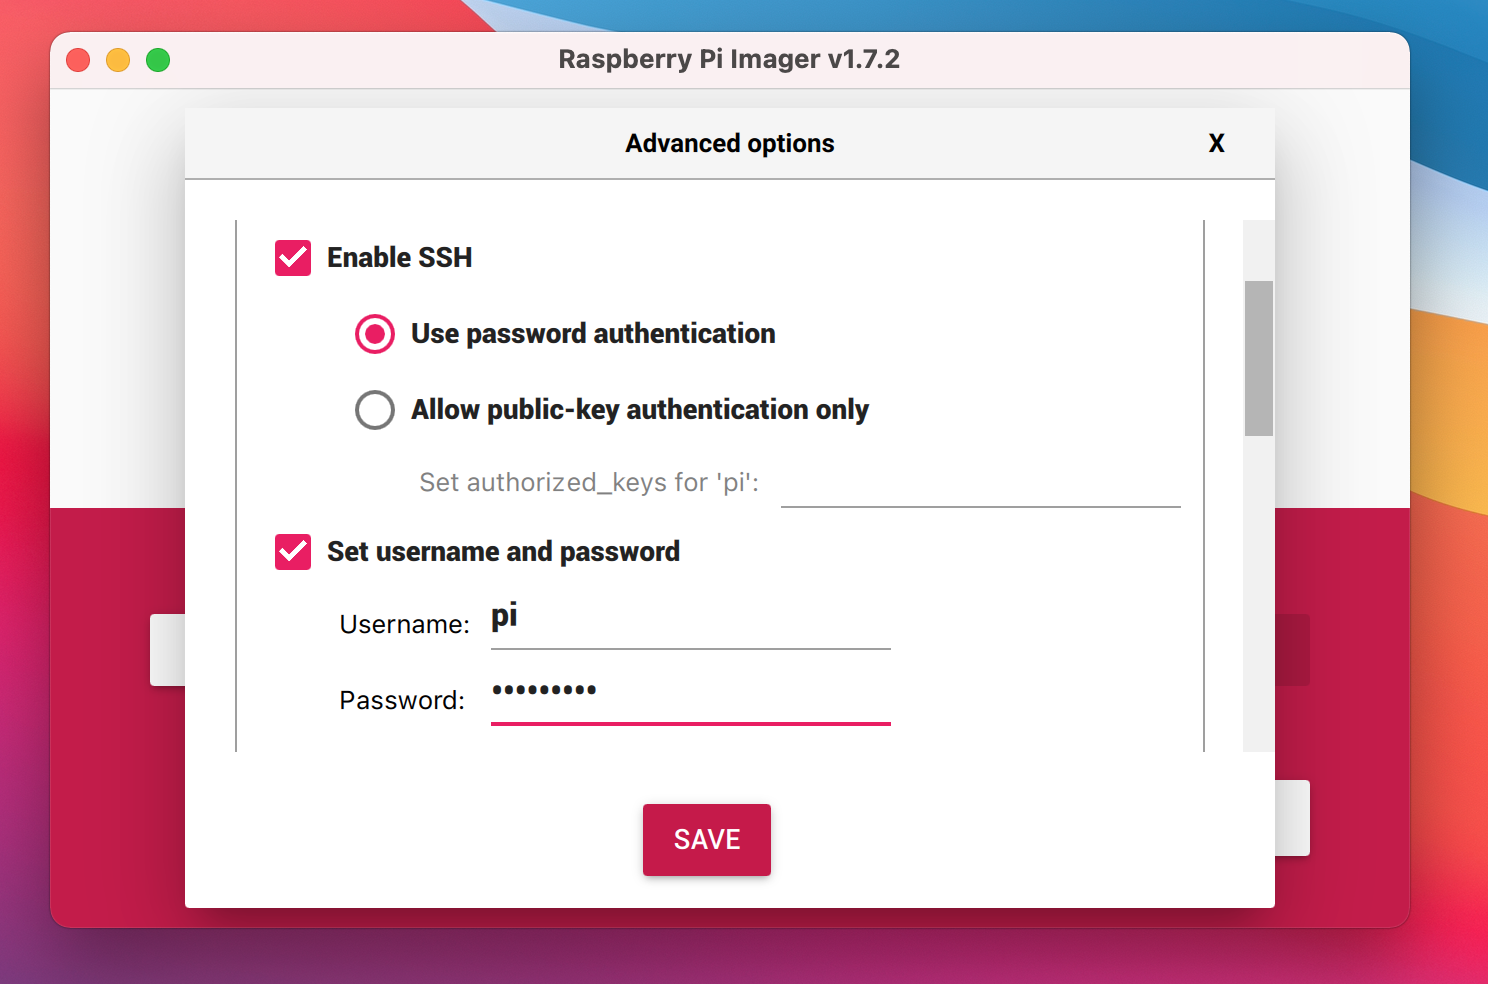
In the first step, you have to set up Raspberry Pi. Install Raspberry Pi Imager on your computer and insert the SD card. Using Raspberry Pi Imager, set operating system to Raspberry Pi OS (32-bit) and select your SD card as storage. Then, in the advanced options window (gear icon), make sure you enabled SSH with password authentication and set up an account username and password.
Click "Write" to install the OS on selected storage.
Once the process is done, eject the card and insert it into the Raspberry Pi.
Plug in Ethernet and power cables into the Raspberry Pi and wait until it starts.
Find Raspberry Pi address in your local network (e.g. in your router admin panel).
For me, it was 192.168.0.10.
Now, verify that you are able to ssh into it from your computer using the account from system installation step: ssh pi:192.168.0.10.
4G USB modem
You can use any USB modem that works in your region. We recommend Huawei modems with HiLink interface (e.g. 4G Dongle E3372) because there is an open source API to interact with them that will let you change the IP on demand: huawei-lte-api.
Insert a SIM card with active Internet plan into the modem and plug it in to your computer. Wait for the modem to start up, find the network and open HiLink interface in the browser. You will be prompted to accept ToS, choose update schedule and provide the PIN code for your SIM card.
Once you are done with this set-up, go to the DHCP section in Advanced setting and set modem IP to a unique value to distinguish it from other connected modems. If you want to build a proxy with only one modem, you can skip this step.
Connect the modem to the Raspberry Pi and, after it's initialized, verify that you can see a network interface corresponding to your modem IP address set during configuration in the output of ifconfig command.
Proxy
Installation
For running the proxy service, you're going to use 3proxy - tiny free proxy server. Login to the Raspberry Pi and download 3proxy Debian package:
wget https://github.com/3proxy/3proxy/releases/download/0.9.4/3proxy-0.9.4.arm.deb
If you want to run the proxy service on a different device or operating system, you have to choose appropriate binaries/package from the release assets.
Now, install downloaded package: sudo dpkg -i 3proxy-0.9.4.arm.deb.
Once it's finished, create admin user:
sudo echo admin:`mycrypt $RANDOM <YOUR_ADMIN_PASSWORD>` | sudo tee --append /usr/local/3proxy/conf/passwd > /dev/null
Filesystem set-up
First, you have to set up some folders and files with appropriate permissions for proxy user. Create a placeholder for 3proxy configuration file and folder for logs:
sudo mkdir -p /usr/local/3proxy/conf
sudo chown 13:13 /usr/local/3proxy/conf
sudo touch /usr/local/3proxy/conf/3proxy.cfg
sudo chmod 660 /usr/local/3proxy/conf/3proxy.cfg
sudo mkdir -p /usr/local/3proxy/logs
sudo chown 13:13 /usr/local/3proxy/logs
Routing
To configure routing for modems, append route table entries for them in /etc/iproute2/rt_tables file.
For each modem you have, add {i} gateway{i} line, where {i} is the modem number.
For example, if you want to use 2 modems:
1 gateway1
2 gateway2
Do not change reserved values in the rt_tables file. Append route tables at the end of the file as local entries.
Now, you can configure IP routing rules for each modem. For that, you need to know modems':
- interface name
- IP address
- network
- gateway
You can get this information from the output of ifconfig command.
In my case, for one example modem, it shows:
eth1: flags=4163  mtu 1500
        inet 192.168.8.101  netmask 255.255.255.0  broadcast 192.168.8.255
        ...
This translates to the following values:
- interface name:
eth1 - IP address:
192.168.8.101 - network:
192.168.8.0/24 - gateway:
192.168.8.1
For the network, replace the last byte in the IP address with 0/24 mask, i.e. 192.168.8.101 → 192.168.8.0/24, and for the gateway set it to 1: 192.168.8.101 → 192.168.8.1.
To configure IP routing, execute the following commands for each modem:
sudo ip route replace {{ network }} dev {{ name }} src {{ ip }} table gateway{{ index }}
sudo ip route replace default via {{ gateway }} dev {{ i.name }} table gateway{{ index }}
sudo ip rule add from {{ ip }}/32 table gateway{{ index }}
sudo ip rule add to {{ ip }}/32 table gateway{{ index }}
For the example modem above with IP 192.168.8.101 it will be:
sudo ip route replace 192.168.8.0/24 dev eth1 src 192.168.8.101 table gateway1
sudo ip route replace default via 192.168.8.1 dev eth1 table gateway1
sudo ip rule add from 192.168.8.101/32 table gateway1
sudo ip rule add to 192.168.8.101/32 table gateway1
3proxy configuration
To start 3proxy service, you have to provide a configuration file.
You've already initialized a placeholder /usr/local/3proxy/conf/3proxy.cfg with correct permissions, and now you can fill it with the following content:
#! /usr/local/bin/3proxy
daemon

config /usr/local/3proxy/conf/3proxy.cfg

# logging
log /usr/local/3proxy/logs/3proxy-%y%m%d.log D
rotate 60

# users passwd file
users $/usr/local/3proxy/conf/passwd

# proxy user and group ids
setgid 13
setuid 13

auth iponly strong

# allow proxy access for local network
allow * 192.168.0.0/24
# assign weights (probabilities) to modems by their IP address
parent 500 extip 192.168.8.101 0
parent 500 extip 192.168.9.101 0

# run proxy on port 2000
proxy -a -p2000

flush

# allow admin panel access to the admin user on port 8080
allow admin
admin -p8080
You will have to adjust parents for your set-up. Each parent corresponds to a single modem which is connected to the Raspberry Pi and has configured routing. Parents' weights must sum up to 1000. An example configuration for a set-up with 4 modems could be:
parent 100 extip 192.168.6.101 0
parent 200 extip 192.168.7.101 0
parent 300 extip 192.168.8.101 0
parent 400 extip 192.168.9.101 0
You can read more about 3proxy configuration options in the package documentation.
Test
If your configuration is valid, you will be able to start proxy with the following command:
sudo 3proxy /usr/local/3proxy/conf/3proxy.cfg
To verify that your proxy works, make a request to https://eth0.me using curl to check your external IP address:
curl --proxy 192.168.0.10:2000 https://eth0.me
Try it a few times and, if you have multiple modems connected, you should get different IP addresses with probability according to parent set-up in 3proxy configuration file.
To stop proxy, simply kill the 3proxy process:
sudo kill -9 `pidof 3proxy`
Change IP
The best part about mobile proxy is that it lets you change the IP address on demand. This is a superpower in web scraping world. The easiest and fastest way to change the IP address is to change the network setting. It should take just a few seconds to get the new IP address assigned.
If you're using a modem with HiLink interface, you can use huawei-lte-api python package to interact with it.
First, install the package: python -m pip install huawei-lte-api.
Then, create main.py file with the following content:
import time

from huawei_lte_api.Client import Client
from huawei_lte_api.Connection import Connection
from huawei_lte_api.enums.net import LTEBandEnum, NetworkBandEnum, NetworkModeEnum


def main(gateway: str, timeout: float = 5.0):
    print(f"Connecting to {gateway}")
    with Connection(url=f"http://{gateway}/", timeout=timeout) as connection:
        lte_client = Client(connection)
        print("Resetting network...")
        net_mode_response = lte_client.net.net_mode()
        net_mode = net_mode_response.get(
            "NetworkMode", NetworkModeEnum.MODE_4G_3G_AUTO.value
        )
        new_net_mode = (
            NetworkModeEnum.MODE_4G_ONLY
            if not net_mode == NetworkModeEnum.MODE_4G_ONLY.value
            else NetworkModeEnum.MODE_4G_3G_AUTO
        )
        time.sleep(0.1)
        lte_client.net.set_net_mode(
            lteband=LTEBandEnum.ALL,
            networkband=NetworkBandEnum.ALL,
            networkmode=new_net_mode,
        )
        time.sleep(3.0)
        print("Done")


if __name__ == "__main__":
    import argparse

    parser = argparse.ArgumentParser(
        description="Reset IP address of a 4G modem with HiLink interface"
    )
    parser.add_argument(
        "--gateway", type=str, required=True, help="modem gateway address"
    )
    parser.add_argument(
        "--timeout",
        type=float,
        required=False,
        default=5.0,
        help="modem connection timeout in seconds (default=5.0)",
    )
    args = parser.parse_args()
    main(gateway=args.gateway, timeout=args.timeout)
Code explanation
IP change happens in the main function.
First, we connect to the modem using a client from huawei_lte_api package:
with Connection(url=f"http://{gateway}/", timeout=timeout) as connection:
    lte_client = Client(connection)
Then, we use it to get the current network mode and, based on that, we infer the new one to change for:
net_mode_response = lte_client.net.net_mode()
net_mode = net_mode_response.get(
    "NetworkMode", NetworkModeEnum.MODE_4G_3G_AUTO.value
)
new_net_mode = (
    NetworkModeEnum.MODE_4G_ONLY
    if not net_mode == NetworkModeEnum.MODE_4G_ONLY.value
    else NetworkModeEnum.MODE_4G_3G_AUTO
)
After we set the new network mode, we have to wait at least a couple of seconds before the modem is ready to accept new connections:
lte_client.net.set_net_mode(
    lteband=LTEBandEnum.ALL,
    networkband=NetworkBandEnum.ALL,
    networkmode=new_net_mode,
)
time.sleep(3.0)
Now, to change the IP address for a modem with IP 192.168.8.101, simply run:
python main.py --gateway 192.168.8.1
To verify that it worked, check the external IP address for modem network interface (in my case, it's eth1):
curl --interface eth1 https://eth0.me
Web scraping use case
Congratulations! At this point, you have your own web automation infrastructure with mobile proxy that lets you rotate IP addresses on demand. Your workflow could involve rotating IP addresses periodically to distribute requests across multiple addresses, improving reliability.
Limitations
Using Raspberry Pi, you are limited to around a dozen of modems if you have a USB hub with its own power supply. With more than that, you are likely to run into various software and hardware issues.
For more advanced web scraping use cases, mobile proxy alone may not be sufficient. You often need headless browsers, JavaScript rendering, and other solutions that let you peacefully sleep at night while your web scraping job is running.
Scraping Fish API
To avoid all the hassles related to large scale web scraping and maintenance of a mobile proxy pool, try Scraping Fish. Get access to our production grade mobile proxy, cluster of headless browsers and all the API features for just $2.
If you enjoyed this content, consider following us on 𝕏 for more!